Games Development - Task 2 / Art Asset Development

Chong Hui Yi / 0363195
Games Development / BDCM
Task 2 / Art Asset Development
TABLE OF CONTENT
1.
Lectures
2.
Instructions
3.
Task 2
4.
Feedback
5.
Reflection
LECTURES
Week 1:
INSTRUCTIONS
<iframe
src="https://drive.google.com/file/d/1PnT4yjnZ2OED7bHjCsQN_lJcPmrYhu-2/preview"
width="640" height="480" allow="autoplay"></iframe>
Task 2: Art Asset Development
Instruction
"Students will be given the task to produce the art asset for their
games. This includes characters, environment, items, props,
obstacles, power ups and HUD design."
What I Worked On
In Task 2, we had to design all of our game’s art assets—this included character designs, props, animations, environment backgrounds, and HUD elements. I mainly focused on the drawing and design parts. Here’s a breakdown of what I contributed:
- Main Character & Weapon Design: Sahira
- Enemy Designs: Skeletal Monster, Sand Pirate, and Undead Cat
- Minion Designs: Mummy Cat, Spiked Clay Wall, and Sandshot Ballista
- Boss Design: Priest of Anubis (Level 2 Boss)
- Game Element: Sand Pot
- HUD Design: All HUD buttons
- Environment Design: Level 2 background, refine the starting page
Research
In Week 3, we had a team meeting to discuss what needed further research. I was in charge of researching what kind of weapon our main character, Sahira, could use to reanimate corpses, and what kind of container could hold the enemies' souls after they die. I also gathered some visual references for Sahira’s character design.
Fig. 1.0 Research
We divided the tasks in our next meeting, and Fig. 1.1 shows the full list of assets. I was mainly responsible for three areas: 8 character designs, environment design, and UI design.
Fig. 1.1 Job distribution
Character Design
1. Sahira (Main Character)
First, I designed our main character — Sahira. She is a beautiful concubine from ancient Egypt whose soul is sealed within a magical bracelet. After being dragged into the present-day Cairo, she retains her graceful appearance and continues to wear her traditional Egyptian attire.
I’ve sketched a concept draft (Fig. 2.0) mainly focusing on designing Sahira’s weapon and the container used to store enemy souls. On the left side of the sketch, there is a little girl. This represents Sahira’s original appearance. She carries a slanted shoulder bag that can open its mouth to absorb enemy souls. The inspiration for this bag comes from the ancient Egyptian canopic jar (Fig. 2.1), which was used to hold the internal organs removed during mummification.
In addition, Sahira holds a weapon that resembles a staff. Its design is based on the Heqa Sceptre, a traditional symbol of power and rulership in ancient Egypt. I added a bell to it. The bell is similar to those used by traditional Chinese corpse herders, who were believed to use bells to control or guide the dead.

Fig. 2.0 Sketch

Fig. 2.1 Design Inspiration Drawn from Canopic Jar
After finishing the draft, I searched Pinterest for more clothing and design references for Egyptian characters. When researching design references, I noticed that many depictions of ancient Egyptian noblewomen, including queens and consorts, often feature armlets or bands worn on the shoulders and upper arms, symbolising status and nobility. Additionally, elaborate headpieces such as chains, beaded headbands, or ornamental headdresses adorned with gemstones and metals are commonly seen. These elements not only enhance aesthetic appeal but also carry cultural and symbolic significance.

Fig. 2.2 Design Reference - Sahira
Then, I made the initial design of Sahira in Adobe Illustrator. In Fig. 2.3, the main difference between the left and right versions lies in the length of the cloth draped over her outfit. I ultimately chose the right version.
Sahira is a cute, chibi-style character about two heads tall. She wears a gem-decorated circlet on her head, a Egyptian-style collar around her neck, and a long sleeveless robe.

Fig. 2.3 Initial Two Designs of Sahira
After I finished designing Sahira, I started designing the canopic jar she carries across her body. The jar has a lid that looks like the head of Anubis. When enemies die, it opens its mouth, shows its teeth, and absorbs their souls. To make room for the blue strap going across her body, I removed the blue feather details from her costume.

Fig. 2.4 Early character & canopic jar design
In Dr Mia’s feedback, Dr Mia said the character design was cute and appealing, but a bit flat due to the lack of shadows and highlights. So, I adjusted the overall details (Fig. 2.5), I added highlights and shadows to the headband, face, body, clothes, and the canopic jar. You can also see the hieroglyphic details on the jar.

Fig. 2.5 Adding shadows & highlights to create depth
For Sahira’s weapon, I wanted something elegant and magical. I explored several versions (Fig. 2.6), all based on a Heqa sceptre with a bell. I added a blue diamond for a mystical touch. I chose the one on the far right for its clean and balanced look.

Fig. 2.6 Weapon Design Variations and Finalisation
I then finalised Sahira’s design (Fig. 2.7), showing both her normal and soul-absorbing states.

2. Skeletal Monster (Enemy)
Next, I worked on the first enemy design skeletal monster. I looked up some references of skeleton-based designs.

Fig. 3.0 Design Reference - Skeletal Monster
This enemy appears in Level 2, Egypt Sands, as an ancient Egyptian guard. So I gave him tattered clothing and a cracked skull. His weapon also looks aged and worn. I created a few colour variations, and my favourite is the first one with a light green tone.

Fig. 3.1 Different Colour Designs
Later, I found that removing the jaw and teeth made him look cuter and simpler. That led to the second version (Fig. 3.2). Beside that, the cracked skull was originally meant to hold a heart, symbolising that he died from heartbreak. This idea became the third version, a heart-themed skeletal monster with white bones.

Fig. 3.2 From left to right: with jaw, jawless, and
hopelessly-in-love skeleton
In the end, I combined the green skeleton without a jaw and the black love-brain idea to create a slightly humorous version of the skeletal monster.

Fig. 3.3 Final Skeletal Monster Design
3. Sand Pirate (Enemy)
The second enemy Sand Pirate appears in level 1. After looking at some design references, I wanted to give him a more mysterious vibe.

Fig. 4.0 Design Reference - Sand Pirate
I designed him to be protected against the sand, so he's covered with a headwrap, robes, and a cloak, with mummy-like bandages wrapped around his mouth, hands, and feet. Additionally, this character attacks using a scimitar.

Fig. 4.1 Design Process - Sand Pirate

Fig. 4.2 Final Sand Pirate Design
4. Undead Cat (Enemy)
Of all the characters, the one I'm most fascinated by is the undead cat (cats are simply too adorable!)! From the design references, I drew inspiration to create a cat wrapped in mummy bandages, with a tail that glows magically.

Fig. 5.0 Design Reference - Undead Cat
So I began designing, and beyond the original concept, I gave it a skeletal skull for a head and added a ring of hieroglyphics around its neck to make it appear more mystical and ancient-looking.

Fig. 5.1 Design Process - Undead Cat
Fig. 5.2 shows the final design of the undead cat, and it attacks using its claws.

Fig. 5.2 Final Undead Cat Design
5. Mummy Cat (Minion - follower)
When players collect souls from both types of enemies, they can craft corresponding minions. There are three types in total: follower, shield, and turret. The mummy cat is the minion created by combining the mummy and undead cat souls.
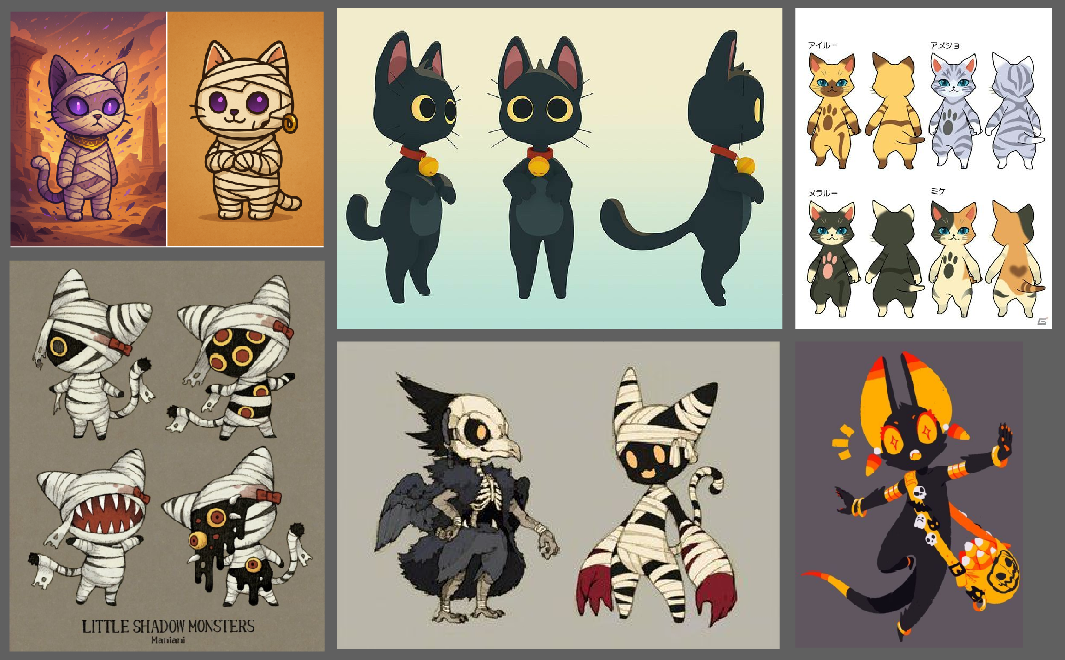
Fig. 6.0 Design Reference - Mummy Cat
At first, I wanted to be a bit lazy and just add more mummy bandages to the undead cat and change it to orange.

Fig. 6.1 Initial Mummy Cat Design
But since it stands on two legs, I made a second version instead. This mummy cat also attacks with its claws, just like the undead cat.

Fig. 6.2 Final Mummy Cat Design
6. Spiked Clay Wall (Minion - shield)
The Spiked Clay Wall is a defensive minion made by combining the sand pot and scorpion. When enemies destroy it, it explodes.
Before designing this, I needed to design the sand pot, which is also one of our game elements. Some sand pots give healing potions, while others explode, adding more fun to the gameplay.
For the sand pot design and the hieroglyphics I used earlier, I got free assets from Freepik, so I didn't need to spend time drawing them myself.

Fig. 7.0 Sand Pot Design
The original design for the Spiked Clay Wall was just a sand pot with a scorpion's tail sticking out. Then I looked at Winnie's design for the howling scorofox (scorpion + sand fox) and changed the scorpion's tail to blue-green to keep it consistent. I also gave the sand pot two little legs to stand on and added eyes.

Fig. 7.1 Design Process - Spiked Clay Wall
7. Sandshot Ballista (Minion - turret)
The Sandshot Ballista is a mobile turret made by combining the skeletal monster and sand pirate. For the appearance, I combined the skeletal monster's skull body and lower clothing with the sand pirate's headwrap and outfit. I made the clothes semi-transparent, inspired by x-ray effects, and changed the green bones to white. Remember the lovestruck skeletal monster from before? I brought the heart element into this design too, haha.

Fig. 8.0 Design Process - Sandshot Ballista

Fig. 8.1 Final Sandshot Ballista Design
8. Priest of Anubis (Level 2 Boss)
The last character is the Level 2 boss, Priest of Anubis. Its design reference is based on Anubis.

Fig. 9.0 Design Reference - Priest of Anubis
This boss has two attack methods. The first is attacking through the Book of the Dead. Here I placed the Eye of Horus (left eye) on the book - this represents the moon god Horus and serves as a protective symbol, adding authentic Egyptian mythology to the design.


Fig. 9.1 Priest of Anubis’s magic book (right image from
Pinterest)
The second attack is shooting ice balls through a black magic staff held in its hand. The boss has that classic Anubis look - black jackal head with glowing eyes and lots of golden Egyptian details. I used a colour scheme of black, royal blue, and gold to give it that authentic ancient Egyptian vibe.

Fig. 9.2 Final Priest of Anubis Design (with two attack
types)
Fig. 9.3 shows all eight characters and game element I designed.

Fig. 9.3 All Characters I Designed
Environment & UI Design
Starting Page
For the starting page, Winnie had a basic design, but I thought it could be improved. First, I redesigned the title. I tried both centred and left-aligned versions, but I felt that for the starting page layout, centred would work better. After lots of experimenting, I added gradients, decorative lines, and placed an ankh Egyptian element inside the "O".

Fig. 10.1 Title design on starting page – center & left
aligned
Besides the title, I added a top-to-bottom gradient background from black to gold. This darkens the background so the title stands out while also highlighting the pharaoh's coffin below.


Fig. 10.2 Improved Starting Page Design - Before (left) &
After (right)
Level 2: Egypt Sands
For the Level 2 background, it's a desert scene with mainly blue-purple and orange colours. The blue-purple makes the environment feel a bit more magical and dreamlike.

Fig. 11.1 Level 2 Background
Since the game needs to repeat the background later, I had to design the left and right edges so they connect perfectly. Fig. 11.2 shows the result of two backgrounds joined together. Besides that, I plan to create a parallax effect in Unity later, so I split the background into 8 separate layers.

Fig. 11.2 Background split into 8 layers
"Next, I designed the layered sand tiles for Level 2, as well as the initial UI. The top left has the player's HP bar, the top right has the map, handbook, and menu buttons, while the bottom left has the craft button for players to create minions.

Fig. 11.3 Initial UI and Tile Designs
However, the team gave feedback that the original craft button was a bit too plain and could be more magical. So I designed other versions of the craft button: a scarab beetle (representing transformation/rebirth), magical stars, a ghost design, and two ghosts combined together.
I actually think the two ghosts better represents the meaning of the craft button, but players might find it harder to see and understand, so I finally chose the third one.

Fig. 11.4 Different Designs for the Craft Button
Besides that, in Fig. 11.5 you can also see I changed the HP bar colour to a golden gradient, making it fit better with the Egyptian theme. When players click the craft button, three minion categories appear first, and then after selecting one category, the detailed minion information is shown (Fig. 11.6).

Fig. 11.5 Refined UI with Crafting System

Fig. 11.6 Follower category in craft menu
Fig. 11.7 shows what happens after clicking the follower category. There are two minions: mummy cat and howling scorofox, and it displays the number of each enemy type needed to create them. Below there's a 'CRAFT' button - if you have enough souls, you can click it to create the minion.

Final Presentation Slide
Fig. 12.0 Task 2: Art Assets Presentation Slide
FEEDBACK
Week 5:
- Dr. Mia said our art assets look visually strong and have a nice, consistent style.
- But we could improve them by working more on shading—to give things more depth, volume, and consistent lighting.
Week 6:
- Dr. Mia liked how our characters and environment designs were coming along.
- A few helpful suggestions she gave:
- Make the animations smoother and more natural-looking.
- Add soft shading to give things more depth without making it look too heavy.
- Tidy up the tile designs so everything feels more cohesive and clear.
REFLECTION
I really enjoyed working on Task 2: Art Assets. Compared to other tasks, this one involved less writing and more drawing and designing, which I personally find more enjoyable. That said, it was still a huge workload! At first, I was worried I wouldn't be able to finish all the character designs I was responsible for, but I'm proud to say I managed to complete them.
A big part of that was thanks to our team leader, Winnie. She organised weekly meetings and always kept track of our progress, which gave me just the right amount of pressure (in a good way!) to stay focused and complete my tasks. I’m really grateful for her guidance and support throughout the process.
I also want to thank Guo Ying, who handled all the animation work by himself—which is honestly amazing. While Winnie and I focused on character and asset design, Guo Ying brought everything to life through animation. I think the way we divided the tasks was really fair, and I’m glad we could each focus on what we do best.
Everyone worked so hard and stayed committed to their parts, and I'm genuinely happy to be part of such a positive and motivated team. Through this project, I’ve truly learnt that teamwork is powerful—there’s no way I could’ve done all this alone.


Comments
Post a Comment